Overview
This post builds on the last post Add JWT Token to Angular HTTP Requests Using NGRX and will ultimately turn into “Part 2” of a series; it probably should’ve been “Part 1” as it provides the actual login UI form and complimentary authentication API with a real JWT, but at the time of writing the first post I didn’t have a series planned…so what’s this post about?
Series Table of Contents
Here we’ll create lazy-loaded routes for both the login and register forms on the client using the same “Smart Container and Dumb / Presentation Component” pattern we leveraged last time. We’ll also continue to use the AddTokenHeaderHttpRequestInterceptor to automatically add the JWT to secure API requests. This time, however, we’ll only apply the token to true API requests (aka we won’t add the token to CSS, JS, HTML, etc) and API requests that are not auth (not login or register). Another change is removing the hardcoded JWT from the NGRX store as we’ll receive it from the API upon successful login or registration. Finally, we’ll look at some minor changes to our mock Node.js backend that allow us to login and register users and pass back JWTs when successful.
If you want to skip the explanation and just start playing with the app, head on over to the GitHub repo for the application.
Assumptions
This post assumes familiarity with Angular and Angular CLI, Angular Material, TypeScript, JWTs, RxJS, NGRX (or possibly Redux), Smart Container and Dumb / Presentation Component, Basic Angular Routing, Node.js, Express, and json-server.
At the time of writing this my system leveraged the following versions:
Node.js: 10.14.2
NPM: 6.4.1
Angular: 7.0.3
Angular CLI: 7.0.5
OS: MacOS High Sierra v10.13.6
The rest of the versions can easily be looked up in the package.json.
We’ll focus on a simplistic implementation for this example that doesn’t use a real database — all data is served from mock JSON files and/or kept in memory when generating new users via registration. To that end, this example is also light on security; there’s no real notion of a true JWT secret, token expiration, token refreshing, password hashing or salting, etc. This example provides a high-level, simplistic Node and Express authentication server and nothing more.
There’s also no form validation (post forthcoming) or routing guards (post forthcoming) on the client to prevent navigating to protected routes, which /beer should be since the API behind it is also protected. This was done to demonstrate that the API will return HTTP statuses of 401 Unauthorized for non-authenticated clients that are displayed in the UI. These features will be implemented in a future post.
Finally, the UI components leverage Angular Material to provide a base set of components and theming style — this allows us to focus less on the design and more on the functionality for this blog post.
Quick Start
Let’s clone the repo and fire up the app so we can see it in action. Open up a terminal and enter the following commands:
wasi$ git clone https://github.com/webappsolution/angular-add-auth-token-ngrx.git
wasi$ git checkout feature/step-1-login-and-register-client-and-server
wasi$ npm i
wasi$ npm run dev-auth
The last command will concurrently start both the server and client — the server uses json-server to quickly scaffold an in-memory JSON database, while the client is the Angular app running via Angular CLI.
Developers can also choose to run the client and sever in 2 separate terminals in case you like reading the console a bit easier:
wasi$ npm run client
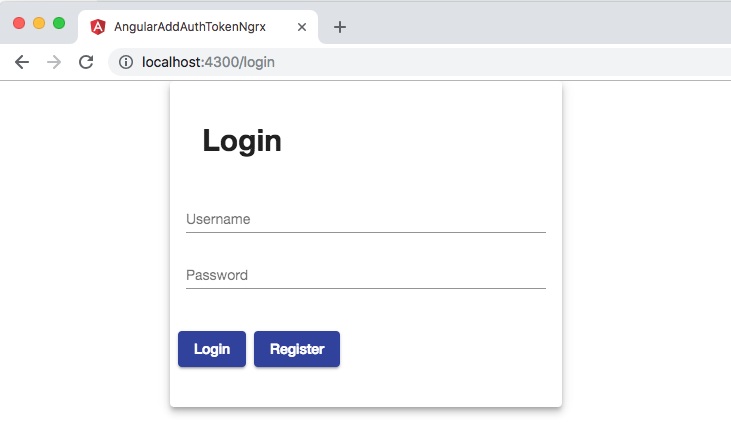
wasi$ npm run server-authNext navigate to http://localhost:4300/login to see the application in action. It should display the login view:

The Client App
Let’s breakdown the new features within the client app one at a time. The key features on the client are new UI components for login and register as well as accompanying NGRX boilerplate and services to make the HTTP requests. We’ll quickly highlight the new views and review how they handle server errors for authentication and user registration.
Login and Register Components
The login and register components are individual features, so we’ll create them as lazily loaded routes each in their own feature directory as seen below.

Since both components are so similar and follow the same “Smart Container and Dumb Component” pattern we’ll just take a look at Login’s “Dumb Component” LoginComponent and “Smart Container” LoginContainer. The job of the LoginComponent is twofold:
Display and present the view with rendered
@Input()data.Handle any and all user interactions and bubble up the event to a smart container using
@Output().
This facilitates easier testing and possible reusability of this component since it’s not tied to the rest of the app.
While the job of the LoginContainer is to provide the LoginComponent its input data and handle its output events — both of these usually require interaction with other parts of the app via injected services, a larger event bus system, or in our case the NGRX store’s action dispatcher and selector functions.
Let’s take a look at the flow starting from the lowest level of the LoginComponent and then move up to the LoginContainer.
Login.Component.HTML
We’ll call out a couple key points here for the login HTML template:
The form’s submit or login button is disabled if the form is invalid (not currently hooked up) OR if the flag
pendingis true (indicating that the login HTTP request is currently inflight.There’s an
errorthat might display if the login HTTP request fails.Clicking the login button fires off the backing component’s
onLogin(event)method.Clicking the register button fires off the backing component’s
onRegister(event)method.
<div class="container">
    <div class="card-wrapper">
        <mat-card class="mat-elevation-z1">
            <mat-card-header>
                <mat-card-title>
                    <h2>Login</h2>
                </mat-card-title>
            </mat-card-header>
            <form [formGroup]="loginForm">
                <mat-card-content>
                    <mat-form-field>
                        <input formControlName="username"
                               matInput
                               name="username"
                               placeholder="Username"
                               type="text">
                    </mat-form-field>
                    <mat-form-field>
                        <input formControlName="password"
                               matInput
                               name="password"
                               placeholder="Password"
                               type="password">
                    </mat-form-field>
                </mat-card-content>
                <mat-card-actions>
                    <button (click)="onLogin($event)"
                            [disabled]="loginForm.invalid || pending"
                            color="primary"
                            mat-raised-button
                            type="button">Login
                    </button>
                    <button (click)="onRegister($event)"
                            color="primary"
                            mat-raised-button
                            type="button">Register
                    </button>
                </mat-card-actions>
            </form>
            <div *ngIf="error">{{ error }}</div>
        </mat-card>
    </div>
</div>
login.component.ts
Looking at the login backing component LoginComponent we can see that it provides @Input() and @Output() decorators for each of the numbered bullet points from the HTML template and the code comments should provide enough detail to warrant omitting it from here in detail.
One key point to note is the use of ChangeDetectionStrategy.OnPush for the component that eliminates unnecessary change detection cycles on this component’s DOM. With this change detection strategy in place it’ll only fire when new, immutable data is pushed into the component via the @Input() or events are fired from the component via the @Ouput() decorators.
import {
    ChangeDetectionStrategy,
    Component,
    EventEmitter,
    Input,
    OnInit,
    Output
} from "@angular/core";
import {
    FormBuilder,
    FormGroup
} from "@angular/forms";
import { LoginCredentials } from "../../core/domain/auth.model";
import * as FormUtil from "../../util/form.util";

@Component({
    selector: "blog-login",
    templateUrl: "./login.component.html",
    styleUrls: [ "./login.component.scss" ],
    changeDetection: ChangeDetectionStrategy.OnPush
})
export class LoginComponent implements OnInit {
    /**
     * An optional error message to display if login failed.
     */
    @Input()
    public error = "";

    /**
     * Flag indicating if login is pending.
     */
    @Input()
    public pending = false;

    /**
     * Dispatches an event to perform login.
     */
    @Output()
    public login: EventEmitter<LoginCredentials> = new EventEmitter<LoginCredentials>();

    /**
     * Dispatches an event to switch to the registration view.
     */
    @Output()
    public register: EventEmitter<void> = new EventEmitter<void>();

    /**
     * Reference to the login form.
     */
    public loginForm: FormGroup;

    /**
     * Constructor
     */
    constructor(private formBuilder: FormBuilder) {
    }

    /**
     * Initializes the component by building the form.
     *
     * TODO: BMR: 01/10/2019: Add form validation in a future post.
     */
    public ngOnInit(): void {
        this.loginForm = new FormGroup(
            this.formBuilder.group({
                username: [
                    ""
                    // [
                    //     Validators.required,
                    //     Validators.email
                    // ]
                ],
                password: [
                    ""
                    // [
                    //     Validators.required,
                    //     Validators.maxLength(ValidationUtil.VALIDATION_RULE.PASSWORD.MAX_LENGTH)
                    // ]
                ]
            }).controls,
            {
                updateOn: "blur"
            }
        );
    }

    /**
     * Accessor for the form's value, aka the data container object representing the
     * form field's current values.
     */
    public getFormValue(): LoginCredentials {
        return {
            username: FormUtil.getFormFieldValue(this.loginForm, "username"),
            password: FormUtil.getFormFieldValue(this.loginForm, "password")
        };
    }

    /**
     * Handles the form submission and emits a login event with the user's credentials.
     * @param event
     */
    public onLogin(event: any) {
        const payload: LoginCredentials = this.getFormValue();
        console.log(`onLogin( username: ${payload.username}, password: ${payload.password} )`);
        this.login.emit(payload);
    }

    /**
     * Emits an event to route the user to the registration view.
     * @param event
     */
    public onRegister(event: any) {
        console.log(`onRegister()`);
        this.register.emit();
    }
}
login.container.ts
Moving up the chain to the last layer in the login UI is the “Smart Container” LoginContainer. As previously mentioned, it’s responsible for accessing data from the NGRX store and passing it to the LoginComponent as well as listening to events from the LoginComponent and dispatching them as store actions. We’ll also make use of the async pipe when accessing NGRX store data to subscribe, unsubscribe and to unwrap observable data passed into the LoginComponent.
There are 2 additional small items of importance here:
This container will serve as the UI element used when routing to the login feature as it encapsulates the
LoginComponent.We’ll combine the HTML and TS backing component into one file here (instead of separating the two like we did with
LoginComponent) for simplicity sake. I used to always separate the two but as IDE’s started to provide the ability to intelligently handle HTML templates within TS or JS files (and for the sake of simplicity) I’ve been combining them to eliminate the extra boilerplate files.
import {
    Component,
    OnInit
} from "@angular/core";
import {
    select,
    Store
} from "@ngrx/store";
import { Observable } from "rxjs";
import { LoginCredentials } from "../../core/domain/auth.model";
import * as fromState from "../../core/state/";
import * as AuthActions from "../../core/state/auth/auth.action";

@Component({
    selector: "blog-login-container",
    template: `
        <blog-login
                [error]="error$ | async"
                [pending]="pending$ | async"
                (login)="login($event)"
                (register)="register($event)"
        >
        </blog-login>
    `
})
export class LoginContainer implements OnInit {
    /**
     * The possible login error.
     */
    public error$: Observable<string>;

    /**
     * Flag indicating if login is pending.
     */
    public pending$: Observable<boolean>;

    /**
     * Constructor.
     */
    public constructor(private store$: Store<any>) {
    }

    /**
     * Initialize the component.
     */
    public ngOnInit() {
        this.error$ = this.store$.pipe(select(fromState.getError));
        this.pending$ = this.store$.pipe(select(fromState.getPending));
    }

    /**
     * Attempt to login.
     */
    public login(event: LoginCredentials) {
        this.store$.dispatch(new AuthActions.Login(event));
    }

    /**
     * Switch to register view.
     */
    public register(event: any) {
        this.store$.dispatch(new AuthActions.NavigateToRegister());
    }
}
Login and Register in Action
Now that we’ve seen how the client works let’s go back to the browser and see it in action. As previously mentioned, there’s no client form validation and this was done on purpose to ensure that the client handles server errors correctly (and really even more for demo purposes).
Navigate to http://localhost:4300/login to see the application in action. Let’s try several use cases and see how the client responds; in each case the “Login” button should be temporarily disabled until the HTTP response is received (due to the pending flag) and if present an error will show in the login UI. The same will be true for the register flow.
Login: Invalid request
Navigate to http://localhost:4300/login. Click the “Login” button without filling out any of the form fields and you’ll see the following errors in the UI and in the console. This is due to some server HTTP request body data validation where we determine there’s no valid username or password.

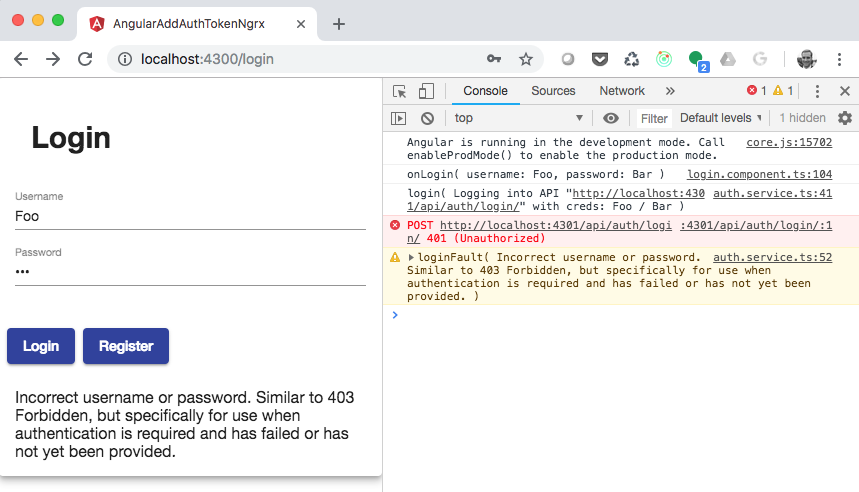
Login: Incorrect Username or password
Navigate to http://localhost:4300/login. Fill out the username and password form fields respectively:
“Foo”
“Bar”
Click the “Login” button you’ll see the following errors in the UI and in the console. This is due to server processing that determines that the username and password don’t match a user in the user database.
Login: success
Navigate to http://localhost:4300/login. Fill out the username and password form fields respectively:
“tom.brady@patriots.com”
“goat”
Click the “Login” button you’ll see the UI route to “Beers”. In this case the username and password were accepted by the server and a JWT was generated and passed back to the client. In addition, the client routes to “Beers” on login success and stores the JWT in the NGRX auth store before using it to request the list of beers from the API.

Register: Invalid request
Navigate to http://localhost:4300/register. Click the “Register” button without filling out any of the form fields and you’ll see the following errors in the UI and in the console. This is due to some server HTTP request body data validation where we determine there’s no valid first name, last name, username or password.

Register: success
Navigate to http://localhost:4300/register. Fill out the first name, last name, username and password form fields respectively:
“Julian”
“Edelman”
“julian.edelman@patriots.com”
“je11”
Click the “Register” button you’ll see the UI route to “Beers”. In this case the user registration was accepted by the server and a JWT was generated and passed back to the client. In addition, the client routes to “Beers” on register success and stores the JWT in the NGRX auth store before using it to request the list of beers from the API.

The Server App
The server is a Node.js and Express app built on top of json-server. Let’s start at the main app file and dig down into the details.
Main
The Express app entry point is the file server/index.js and sets up the json-server for simple beer data APIs, routes to handle our login and register API endpoints and a couple HTTP interceptors.
Create Json-server
Create the json-server, provide it the beers mock JSON data so it can create its API routes, and add in the bodyParser so we can access HTTP request body data (aka login credentials and register new user data).
// Create the json-server and provide it our database file so it can create
// API routes to access our in-memory data.
const server = jsonServer.create();
const router = jsonServer.router("./server/database/mock/db.json");

// Setup express request body parsing.
server.use(bodyParser.urlencoded({extended: true}));
server.use(bodyParser.json());
server.use(jsonServer.defaults());
Add HTTP interceptors
Create an authentication request interceptor and mock data request interceptor. The former inspects HTTP request headers for the authentication header with a valid JWT, while the second simply adds a delay to our mock API data requests to simulate real network latency. We’ll talk about authTokenHttpRequestInterceptor in detail for beer requests later in this post.
// Add a security filter to intercept and inspect requests for valid tokens.
server.use(authTokenHttpRequestInterceptor.intercept);

// Delay all mock data request.
server.use(mockDataHttpRequestInterceptor.intercept);
Routing And Start Server
Create the authentication routes and map them to the exported routes in the authController, create the API routes to our json-server mock data and start the server. Take note how the authController routes are prefixed with /api/auth so that when we define our login and register routes later in the controller they’ll only need to specify their exact endpoint.
// API routes.
server.use("/api/auth", authController);
server.use("/api", router);

// Start the server.
server.listen(config.port, () => {
  util.consoleReset();
  console.log(`----------------------------------------------------------------------`);
  console.log(`Running Auth API Server on: http://localhost:${config.port}`);
  console.log(`----------------------------------------------------------------------`);
  console.log("\n");
});
Authentication and Registration
The authentication and registration processes are broken down into two modules:
AuthController: server/auth/auth.controller.jsAuthService: server/auth/auth.service.js
Authentication controller
The controller is responsible for defining auth routes and route handlers. It is not responsible for business logic like authenticating the user and generating a JWT or registering and creating a new user. These responsibilities are delegated to the authService. Let’s breakdown the controller to understand its role.
First create our /api/auth/login and /api/auth/register routes. Take notice how the initial context of /api/auth is not defined below in our route definitions. As previously mentioned, the main app entry point defines the routes to the authController using /api/auth so that we can simplify the endpoints here and leave higher-level orchestration and routing up to the main app.
// Define the list of auth routes and matching handler methods.
router.post("/login", authenticate);
router.post("/register", register);

// Export the routes defined here in this controller to the main server setup.
module.exports = router;
Next we’ll define our route handlers and helper methods to validate the incoming request data, delegate business functionality to our authService and finally to create successful and failed responses to our client.
// Handles auth requests that don't contain the required data: username and password.
function invalidLoginRequest(res) {
  const message = `Invalid login request. Must contain a valid username and password. ${httpStatus["400_MESSAGE"]}`;
  console.log(`invalidLoginRequest( ${message} )`);
  return util.createErrorResponse(res, httpStatus.BAD_REQUEST, message);
}

// Handles registration requests that don't contain the required data.
function invalidRegisterRequest(res) {
  const message = `Invalid register request. Must contain a valid firstName, lastName, username and password. ${httpStatus["400_MESSAGE"]}`;
  console.log(`invalidRegisterRequest( ${message} )`);
  return util.createErrorResponse(res, httpStatus.BAD_REQUEST, message);
}

// Handles failed authentication attempts.
function incorrectLoginCredentials(res) {
  const message = `Incorrect username or password. ${httpStatus["401_MESSAGE"]}`;
  console.log(`incorrectLoginCredentials( ${message} )`);
  return util.createErrorResponse(res, httpStatus.UNAUTHORIZED, message);
}

// Handles failed user registration attempts.
function failedToRegister(res) {
  const message = `Cannot register user. ${httpStatus["400_MESSAGE"]}`;
  console.log(`failedToRegister( ${message} )`);
  return util.createErrorResponse(res, httpStatus.BAD_REQUEST, message);
}

// Handles the requests that attempt to authenticate the user.
function authenticate(req, res, next) {

  // Attempt to grab the username and password from the request.
  let username = null;
  let password = null;
  try {
    username = req.body.username;
    password = req.body.password;
    console.log(`authenticate( ${username} / ${password} )`);
    if(!username || !password) {
      invalidLoginRequest(res);
      return;
    }
  } catch (err) {
    invalidLoginRequest(res);
    return;
  }

  // Attempt to authenticate the user.
  const token = authService.authenticate(username, password);
  if (!token) {
    incorrectLoginCredentials(res);
    return;
  }

  // We have a valid token so return a success response with a token.
  util.createSuccessResponse(res, {accessToken: token});
}

// Handles the requests that attempt to register a new user.
function register(req, res, next) {
  let username = null;
  let password = null;
  let firstName = null;
  let lastName = null;
  try {
    username = req.body.username;
    password = req.body.password;
    firstName = req.body.firstName;
    lastName = req.body.lastName;
    console.log(`register( Registering "${firstName} ${lastName}" with username and pw: ${username} / ${password} )`);
    if(!username || !password || !firstName || !lastName) {
      invalidRegisterRequest(res);
      return;
    }
  } catch (err) {
    invalidRegisterRequest(res);
    return;
  }

  // Attempt to register the user.
  const token = authService.register(username, password, firstName, lastName);
  if (!token) {
    failedToRegister(res);
    return;
  }

  // We have a valid token so return a success response with a token.
  util.createSuccessResponse(res, {accessToken: token});
}
Authentication Service
The service is responsible for business logic like authenticating the user and generating a JWT, registering and creating a new user, and / or interacting with a database. It is not responsible for handling HTTP requests from clients as that is the job of the aforementioned controller. Let’s breakdown the service to understand its role.
First create a reference to our in-memory users database along with some help methods we’ll use to determine if a user and a matching user and password exist in said database. Notice how we’re simply loading a JSON file into memory and accessing its users array at runtime.
NOTE: In a production app we’d use a real database, but for demo purposes this more that suits our needs and is considerably easier to setup.
// Create a reference to our mocked out users database.
const usersDatabase = JSON.parse(fs.readFileSync("./server/database/mock/users.json", "UTF-8")).users;

// Check if the user exists in database (matching username and password) which we'll say is good enough to be authenticated.
function doesUsernameAndPasswordExist({username, password}) {
  return usersDatabase.findIndex(user => user.username === username && user.password === password) !== -1;
}

// Check if the user exists in database (matching username).
function doesUsernameExist({username}) {
  return usersDatabase.findIndex(user => user.username === username) !== -1;
}
Next we’ll look at the business logic methods. Using the helper methods above we’ll determine if a user matching the username and password exist in the user database when calling the authenticate() method and then use our createToken() method to generate a JWT. Similarly we’ll “create” and register a new user with the register() method ensuring that the user doesn’t already exist. In both cases we’ll return a valid JWT for success or null for failures.
Remember, it's the job of our authController to send back either successful or failed HTTP responses to the client by handling the results from the service.
// Create a token from a payload.
function createToken(payload) {
  const jwtConfig = {
    expiresIn: config.jwt.expiresIn
  };
  return jwt.sign(payload, config.jwt.secretKey, jwtConfig)
}

function authenticate(username, password) {
  console.info(`authenticate( ${username} / ${password} )`);

  if (doesUsernameAndPasswordExist({username, password})) {
    console.info(`authenticateSuccess( ${username} )`);
    return createToken({username, password})
  } else {
    console.warn(`authenticateFault()`);
    return null;
  }
}

function register(username, password, firstName, lastName) {
  console.log(`register( register "${firstName} ${lastName}" with username and pw: ${username} / ${password} )`);

  if (!doesUsernameExist({username})) {
    console.info(`registerSuccess( ${username} )`);
    const newUser = {
      id: usersDatabase.length + 1,
      username: username,
      password: password,
      firstName: firstName,
      lastName: lastName
    };
    usersDatabase.push(newUser);
    return createToken({username, password})
  } else {
    console.warn(`registerFault( User "${username}" already exists. )`);
    return null;
  }
}

module.exports = {
  authenticate,
  register
};
Securing Endpoints
All of this was setup to enable secure connections to our /api/beers API endpoint with a valid JWT in HTTP request headers…so where do we check for valid JWTs in our server code? Enter the interceptor or HTTP middleware.
auth-Token.Http-Request-Interceptor
The authTokenHttpRequestInterceptor is responsible for inspecting all requests that require a valid JWT before allowing them to access secure endpoints like /api/beer. If an incoming request has an invalid JWT we’ll kick back a response error of 401 to the client before the request even makes it to the requested API endpoint. If it’s valid we’ll allow it to continue on to either the next interceptor or the final requested route.
Let’s start by looking at the intercept(req, res, next) method that handles the incoming request.
module.exports = {
  intercept: (req, res, next) => {
    if (requiresTokenValidation(req.url)) {
      console.log(`intercept( Validate token. )`);
      if (isAuthHeaderInvalid(req)) {
        invalidAuthHeader(res);
        return;
      }
      try {
        verifyToken(getTokenFromHeader(req));
        next();
      } catch (err) {
        console.warn(err);
        invalidToken(res);
      }
    } else {
      // console.log(`intercept( Don't validate token; either auth API endpoint or not an API endpoint. )`);
      next();
    }
  }
};
Now we don’t want to validate the token on every request; we only want to validate it for actual API requests — those that hit /api/* — but not for auth endpoints — those that hit /api/auth/*. This is handled by the requiresTokenValidation(url) method. If the API endpoint doesn’t require a token we’ll simply allow the request to move along in the chain via the next() method. Otherwise we’ll attempt to validate the toke.
function isAuthApiEndpoint(url) {
  return url.indexOf("/auth") !== -1;
}

function isApiEndpoint(url) {
  return url.indexOf("/api") !== -1;
}

function requiresTokenValidation(url) {
  return !isAuthApiEndpoint(url) && isApiEndpoint(url);
}
Finally we’ll attempt to validate the JWT for required API endpoints using the verifyToken() method. If it’s valid we’ll again allow the request to move along in the chain, otherwise we’ll kick back an error to the client.
// Verify the token.
function verifyToken(token) {
  jwt.verify(token, config.jwt.secretKey, function(err, decoded) {
    if (err) {
      console.log(`verifyToken( INVALID )`);
      throw new Error(`${err.name}: ${err.message}`);
    } else {
      console.log(`verifyToken( VALID )`);
      return decoded;
    }
  });
}
Conclusion
In this tutorial we saw how to create an Angular UI for login and registration using Smart Containers and Dumb Components with NGRX and how to create a Node.js + Express app with authentication and registration that generates and validates JWTs. Key points to the example are:
Create Login and Register components with smart containers.
Use NGRX framework to bubble up user events to effects and finally HTTP service calls.
Save the authentication token in the store on successful login and registration calls.
Use the JWT on secure API requests from the client to the server.
Check for a valid token to secure API endpoints using Express middleware or interceptors.
See the code in action by grabbing the GitHub repo for the application.